
 Login
Login

Tabs and Buttons (Elements)
A tab is placed along the bottom “row” of the app and a new tab is added each time you want to create a new page. Selecting from the different tabs determines what type of page you will create (i.e. Home, NearBy and Custom).\n\nA button/element is an icon you put within a page to allow for various functionality (call, email, facebook, lists, etc).
Tabs are what sit at the “bottom” of your app screen and allow users to locate different pages within your app, whereas the buttons are what allow functionality within the app. Some are invoked from the bottom of the screen and others can be selected by putting them anywhere within your pages.\n\n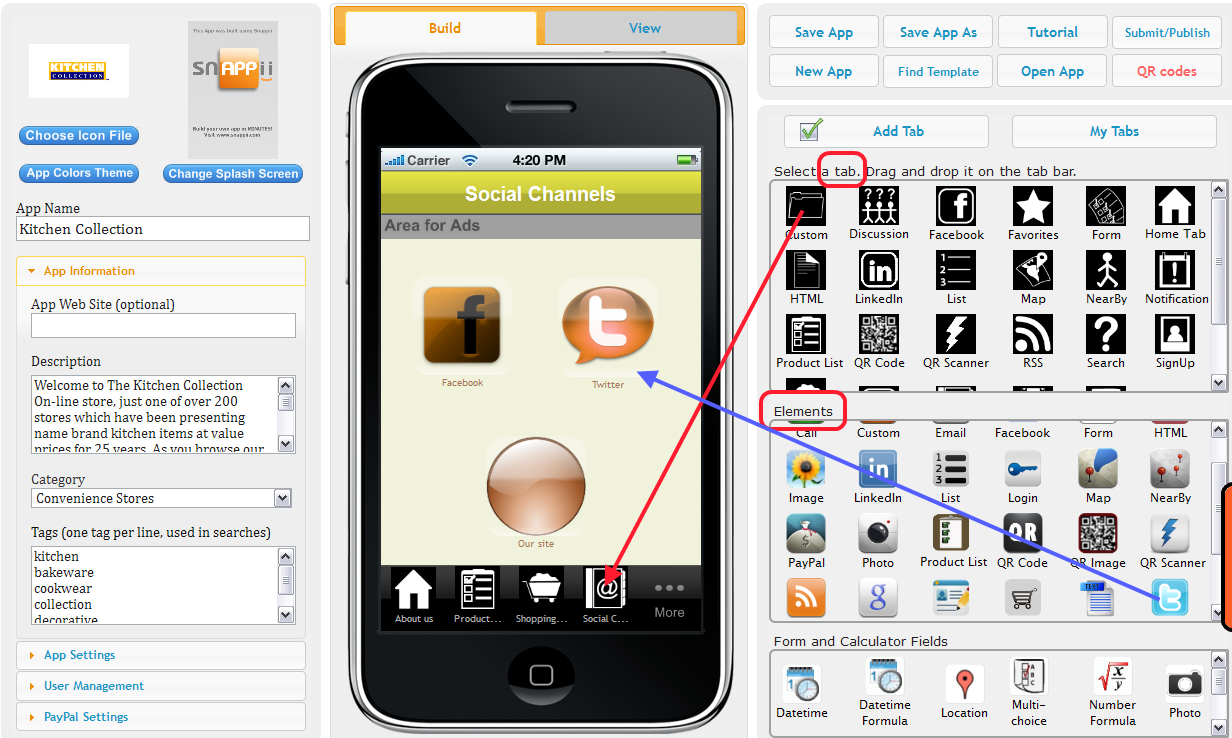
The information like Phone numbers or locations can be added to Favorites via the Map and/or NearBy elements. If you have these elements in your app, drag and drop Favorites tab where all the places, added to Favorites from NearBy/Map, are stored. Read more here.
Nearby Tab perfectly suits businesses with multiple locations. All you need to do is enter the name of your business, and it will show up in Nearby wherever user happens to be. Just imagine how convenient it is! You can always drive users to your nearest location. Continue reading “What is the NearbyTab?” »
Search allows you to either browse a specific site you enter, or internet for a specific keyword.\n\n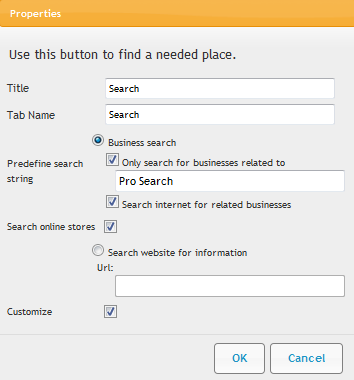 \n\nWhen you choose to browse site, you enter a keyword in a search string, it will show all the related info to the search term.\n\nWhen you choose to browse the Internet on a particular keyword, it will show all the results as if you were browsing Google.
Adding a Discussion tab to your app helps you open a dialog with your customers. Use this tab to help customers interact with each other and with you. Your customers can ask questions and other customers or you can answer them. To participate in discussion forum, a user needs to log in, so this is one of the obvious benefits of signing up. Continue reading “How is Discussion Forum used?” »
Home Tab is like a face of your app. You can place your logo for users to see, and write a short message either about what the app is about, or what your company does, or a logo, etc. Continue reading “What is the Home tab?” »
Use List button when you want to show a list of items. When an item is selected a detailed view is shown. You can upload different lists to show info you wish. Drag and drop the List tab/button, download sample spreadsheet and modify it exactly how it looks in sample. You can’t use spaces in the headers, you can’t use formatting like Bold, Italic or Underline. Your file must be Excel 2003 and higher. You will see the List view template – it means how your app users see the list. You can choose any of the 4 templates and move to the Detail view template and choose 4 variants of the detail view.\n\n \n\nRead more in our User Manual.
The advanced list button allows deeper and more detailed information and functionality than the standard list button. An advanced list takes advantage of datasources to provide a richer more robust functionality to your users. Continue reading “What is the Advanced List button?” »
This button stores all the submitted reports in one place as a PDF or Excel file. It’s a great substitution for Advanced List element in case you just want to display the report as it is. The settings of the Form report List button allow to select the button view – Button, Framed view or Full screen view just like it works for Advanced List. The List view template can be set with 3 different templates.\n\n
Data Source enables apps to work with data that is located in Database created on Snappii server or the data coming from external web services.\n\nUsers can use Data Sources to store and retrieve data inside apps. The data from Database can be populated from the Advanced list and users can update these lists right in the apps. Another way to update a Data Source is by using an Advanced Form. The information in the Data Sources can be sorted, searched, edited, updated, and deleted, it is stored on devices, uploaded from computer and can be sent via email. Everyone can use data from Data Source practically in all standard elements (YouTube button, Map, RSS, Twitter, etc.) to increase the app functionality. Continue reading “How to use Datasource dialog?” »
Runtime datasources is a great option to use inside big companies. This feature will allow to share data sources among some specific users but not all app users. On the app registration form, app users will enter the company identifier when they register. If users work in the same company they should enter the same value for this identifier. It will allow them to work with the same set of data. Continue reading “What is Runtime Datasource?” »
Relationships project allows Snappii users to create multilevel lists using advanced lists and advanced forms tabs and buttons. There are 3 types: One to One, One to Many and Many to Many relationships types. Continue reading “How to create multilevel lists using relationships?” »
Universal form is a combination of a simple Form and a Form that uses DataSource. If you need to put a form to your app, you can choose whether to use a simple form or a form that would take data from the DataSource. Use Universal Form to create input fields which can collect information from users. Continue reading “What is the Universal Form tab/button?” »
The table selection control is used to allow users to create relationships between the data entered/edited on the form, and the data selected on the table selection control.
Table selection allows to:
– fill table element with data from data source.
– replace table element with a more user friendly element.
– fill form fields with data from data source.
Use Case 1: App creator has a data source with pictures and wants his users add these pictures into table element on form. User clicks table selection element, chooses needed photos with a check box, clicks Save button and photos will be automatically added into table.
Use Case 2: In the app there might be a form for getting some company information like name, address, email, website, etc. App user would fill out the form and the company information would be saved to a datasource.
Now there might be multiple other forms in the app where this company information needs to be filled into multiple input controls on the form so the user doesn’t need to re-type the company info every time.
Forms can be embedded on advanced list, gallery and map detail views and also on custom tabs/button views. In this way, multiple forms could be added on one page. You can choose if this form is displayed as a button, or as framed view, specify the element height and width.
Embedded form is used to Add/Update information that was previously filled in from the Universal Form and is stored in Advanced list. Simply add the new universal form on the Advanced list cell or detail view, select the same Datasource as you use for the Advanced list and the original Universal form. Now select if you want to Add or Update information in the Saved Advanced List. Choose an option and click OK. Now drag and drop the form fields to this embedded form, you can select only those fields you want users to actually change. Once your app users click to Update the saved data and fill out the embedded form, the data will be changed right away. No need to close the app and open it again.

Fields Wizard allows to create a form that can be saved as a template form. Click on a field you want to add to your form, click Add, name it and it will appear in your form.\n\nYou can save the form fields as a template and use in your other forms by clicking “Select form fields from template” and choosing your saved template.\n\nRead more in our User Manual here
This setting allows you to specify what you want users to do with the submitted report:\n\n- View and Save\n\n- Just Save\n\n- By the user’s choice\n\n- By the boolean’s input choice\n\n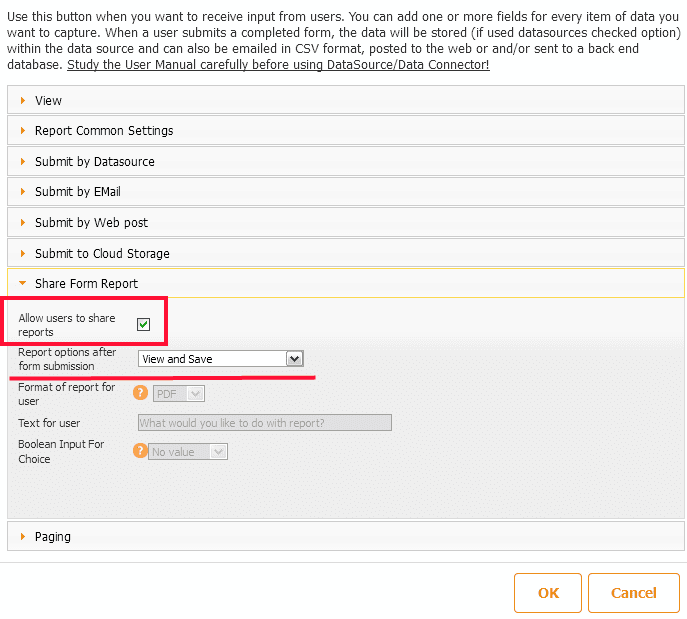
First, create PDF templates using online tools like http://www.pdfescape.com or http://www.pdfamigo.com/. Take any PDF form you already have and import it into Snappii Editor when creating a Universal form.\n\nSimply create your PDF file and name the form fields according to your fields in the Datasource. Save the PDF. Create an Excel spreadsheet with the corresponding form fields’ names. Save this spreadsheet and upload to the Datasource dialog. Save it. Continue reading “How to create custom PDF reports?” »
Pagination makes it possible to split long digital forms into several pages for an easier and more convenient access. Each page can be submitted separately if all required fields are filled out properly. Percents at the bottom right corner show how much of the form is already completed.\n\n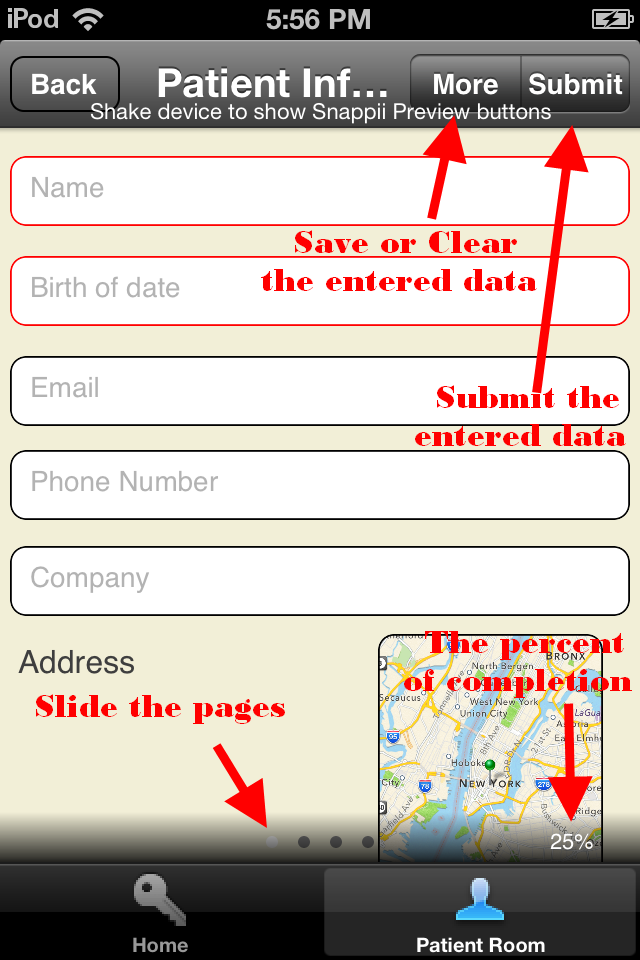 \n\nRead how to set up paging here
With the Map Tab you have the ability to display your business locations on a map, and give users directions how to get there. This will help users of your app to visually see how to get to your business locations. To add this tab to your apps, log in, go to My Apps, click Edit your app, click Add Tab and choose Map tab. Simply upload a list of your locations, and see them all on the map in Preview app. You can upload as many locations as you want. If you have more than 50, you will see the Show more button. You can also change your current location by clicking the globe icon.\n\n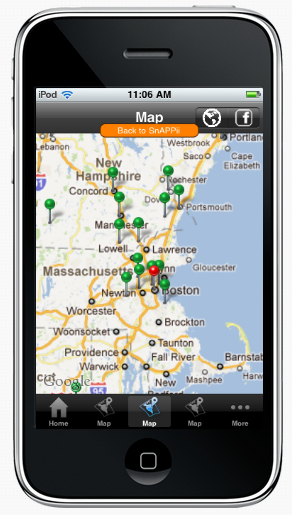
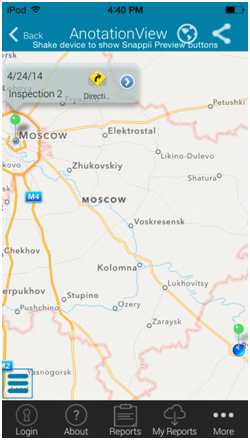
The Advanced Map allows users to show all items from the list on a map. You must add latitude/longitude location column to the list. You have total control over the Map view now. Choose to:\n\n–Text for each pin on a map\n–Information your app users will see once the pin detail view is clicked\n–Show all locations via list deciding what information your app users will see Continue reading “What is the Advanced Map tab/button?” »
This button is added to all advanced controls including: Advanced Map, Advanced Gallery, and Advanced List.
When the button is tapped in the app, the data from the specified location field will be used as the destination.
The starting location in most cases will be the user’s current location. However, on advanced map if the user has changed the starting location shown on the map to some manually entered location, then this should be used as the starting location.
Use a Custom Tab to create a totally customized page where you can drag and drop text, images, email button, call button, social media buttons, hyperlink button and YouTube button, etc. Continue reading “What is the Custom Tab/Button?” »
The Photo Button lets developers create apps that leverage the mobile device camera to take pictures which can be shared, emailed, posted to a website, and sent to a corporate database. The camera has become a scanner of sorts to take pictures of documents and for other personal and business needs. This can be very useful for any number of reasons:\n\n–Document car accidents\n–Report vandalism\n–Report news\n–Send pics of houses for rent and purchase Continue reading “What is the Photo Button?” »
RSS looks like a news feed when added to an app. User can read news right from your site, and recurrently visit it. If your site doesn’t have an RSS, then you could add an RSS about the topic around your app.\nSome Snappii users get an RSS from their Twitter, it’s also a good way to get people’s interest.\nAnyway, it won’t hurt to add something useful for your users to read. Simply add RSS tab/button and you’ll see a dialog asking you to load the feed.\n\n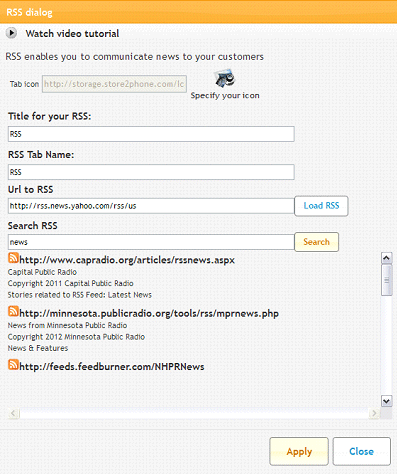
Extend you app with HTML, CSS, JAVA Script code to do anything you want. For example use in-app HTML to create custom database query, registrations, integration with other systems, etc. You can re-use existing code from your website.\n\nRead more about JS Plugin Tab/Button in our Snappii User Manual here
Push Notification is a built-in technology in smart phones that allow pop ups to appear when notifications are pushed out. They are a great way to keep your users updated on the latest happenings with your business.\nPlease keep in mind that Apple rejects apps that send promotional material “Apps that use Push Notifications to send unsolicited messages, or for the purpose of phishing or spamming will be rejected”.\nSnappii users can send notifications right from the app.\n\nRead more in our User Manual here
Product List works pretty much the same way as usual List tab/button does. There is a sample spreadsheet which can be downloaded and modified according to your needs. In difference with List controls Product List contains pricing details which are visible then in the app. As well the Details page shows up a Shopping Cart button after clicking on it, a chosen item goes directly to the Shopping Cart to be purchased.\n\n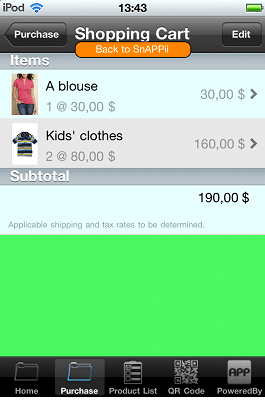
Yes. Snappii provides PayPal support for credit card payment functionality. PayPal allows users to purchase physical goods or services such as organization memberships that give users benefits outside the app itself. Continue reading “Can I build apps that take credit card payments?” »
The calculator button allows you to make calculations using the date/time and/or number formula fields within a form.\n\nDrag and drop text or datetime fields onto Calculator tab/button. Choose the “Number” in the Data type of your text field and date, time or datetime format in your datetime field. To make calculations, use the Datetime or Number formula fields. Enter the formula to get needed calculation result.\n\nRead more in User Manual here
This element is added to the Universal Form. It is added on the Universal Form element together with the formula fields. When you click it, it performs calculations. Once you add it, you will see the list of available formulas. You can specify which one you want to be calculated automatically and which only after Calculate button is pressed.
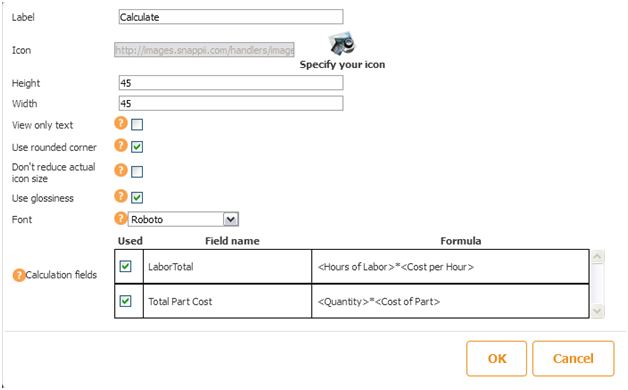
Calculated / Formula fields allow making calculations, showing user’s personal information, location data and more. Formula fields can be added to such controls as Form, Advanced Form, Universal Form, Advanced List and Gallery Layout and can be found in the Elements Panel – Form and Calculator Fields. They are:
1. Datetime Formula – read more here
2. Number Formula – read more here
3. Text formula – read more here
Add additional variables to extract parts of textAddress for user location result:
| <user.location.textAddress.address>
<user.location.textAddress.city> <user.location.textAddress.region> <user.location.textAddress.country> <user.location.textAddress.zip> |
Viewing Formulas option allows you to enable/disable input fields for Form and Calculator controls (Datetime, Location, Multichoice, Photo, Sign/Draw, Table and Text/Number fields) depending on the condition (formula) you’ll specify.\n\nWhen any of the input controls is dragged and dropped to Calculator, Form, Advanced Form, Universal Form, Advanced list, Gallery Layout, there will be an option to use formula to determine whether the control is disabled or enabled.\n\nStudy the User Manual for Viewing Formulas Option here
All controls in the “Elements” section and the “Form and Calculator Fields” section have the viewing formulas.
There are four options for viewing formulas:
- use formula to disable field
- use formula to enable field
- use formula to hide field
- use formula to show field
- Automatically move other controls up to fill space when this control is hidden
2.2. Viewing formula for tabs.
You can include following variables into a formula to show/hide the tab:
- <user.userName>
- <user.emailAddress>
- <user.memberId>
- <user.userType>
- <user.location>
- <user.location.latitude>
- <user.location.longitude>
- <user.location.textAddress>
- <user.location.textAddress.address>
- <user.location.textAddress.city>
- <user.location.textAddress.region>
- <user.location.textAddress.country>
- <user.location.textAddress.zip>
- <device.version>
- <device.model>
- <device.language>
Use cases:
Example 1: Show new questions to user depending on his answer on forms.
Example 2: Display different pictures to users depending on what you have in data source. If a pilot is unavailable, we can highlight him with red color. If he is available – with green.
Example 3:App creator can give some users access to a form (or any other button) with a password – the form will not be visible or accessible until the user enters a valid password.
Example 4: Display different background pictures for users depending on what country they are from.
Yes, you can. The universal form tab/button allows you to collect whatever information you would like to receive from your users. You can use this form for many things including surveys, completing applications, scheduling appointments and signing up for membership. The data is then collected right from the app and emailed to you in the format you have specified.\n\nRead more information on Data Collection here
You can use the Sign Up Email box that is placed to the left from the iPhone simulator in Editor under “Miscellaneous” to say ‘Hello’ or thank registered users for choosing your app. Just input any message in the box and all users who signed up in your app will receive your follow up email.
Allows to create image galleries by taking images from uploaded DataSources. The following image galleries types are available:\n\n– Grid\n– Horizontal view\n– Split View\n\nRead more about each type here\n\n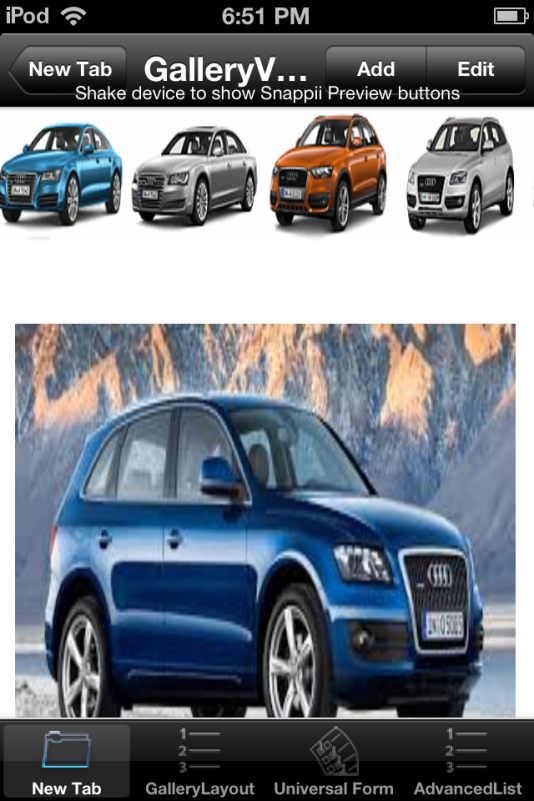
Apps created with Snappii can connect to Internet web services and enterprise backend systems using RESTful services. This can be done without any programming. You create a data connector that is an XML document which specifies how to “talk” to a web service. Once the document is imported into Snappii and appropriate security is enabled, any app can receive and update data in any systems. Here is a link for more information: https://www.Snappii.com/blog/articles/The_Snappii_Platform_Brings_Web_Services_to_Your_Enterprise_App
With the help of this tab it is possible to create and share digital signatures or draw pictures and send them to your friends and etc. Just add this element and draw anything you would like to share.\n\n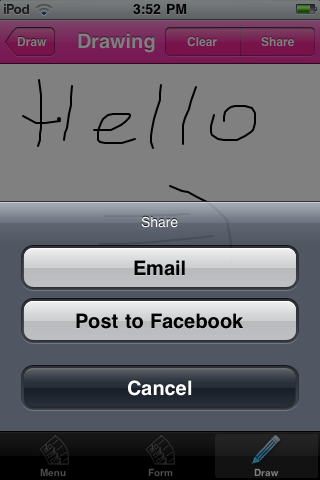
This control allows to share data by posting via Facebook, Twitter, Weibo, sending via Email, SMS, assigning to Contacts, copying to Board, printing out and saving to Camera Roll.
It’s easier to share your app with others. Simply fill out the Message you want to share and put a check next to “Share predefined message only”.
Use this tab to show Facebook pages to users. Use a mobile version of a URL which begins with letter “m”. To figure out the full url go to http://m.facebook.com site. Navigate to particular page of interest. Then copy the URL and paste it in to the url field. Continue reading “Facebook Tab/Button” »
Use this button to show LinkedIn pages to users. Navigate to particular LinkedIn page of interest using mobile browser. Then copy the URL and paste it in to the url field of LinkedIn control. Continue reading “LinkedIn Tab/Button” »
Use Twitter tab to show your tweets to the users. Simply enter your username on Twitter. Now your app users can see your Twitter updates. Continue reading “Twitter Tab/Button” »
You can add a link to your YouTube videos, simply copy it and paste in the YouTube tab/button.
This button allows you to add links to websites. The links will open inside the app or in browser.
Use this button to one-click call a number specified in Snappii editor.
Use this button to one-click send an email to the email address specified in Snappii editor.
You can add images to your app using this element. Add this element to the tab, a window asking about image location will appear. You can find the image in the internet, upload it from your computer, specify the web page with this image, or specify a direct link to this image. Choose Image height and width, as well as its quality by checking the “Don’t reduce the size after saving” option, and click Save. If you need to edit the image, click on the image and choose Edit element button.
This button allows users to log in into your app with the credentials they used when registered, or with the credentials you send them in case of User Management.
Use this element to add text in your application. To show user information you can use the following variables: <user.username>, <user.emailAddress>, <user.memberId>, <user.userType> (e.g., “Welcome <user.userName> etc”). Specify the text size, color, alignment and width.
This button allows your app users to send text messages to the predefined phone number.
This button makes it easy to add a contact to the user’s Address book.
This element allows to add any item to Favorites. Let’s consider a use case. There is a list of doctors in the app, any doctor can be added to Favorites. Create a datasource of doctors. Upload it and save. Add Advanced list to display the doctors. The Cell view must be “custom” mode in order to add “add to favorites” button to it. Now go to Datasource dialog. Click to Add new datasource.
A separate datasource type called “Favorites” is available in the Datasource dialog.
Once chosen, name it. The very first value that you see there is “Name”. This field will be shown in a pop-up window when the item is added to Favorites. You can insert any value that is appropriate. Then click the Plus button to add the fields to it. We will add Doctor’s name, Picture and Specialty. Basically, all the fields we want to be added to Favorites. Save the datasource. Now go back to the Doctors Advanced list, drag and drop “Add to favorites” button to the Cell view, click its settings: Select Data Source –> Favorites, Favorites fields mapping –> Change –> Map the Favorites datasource field with the Doctors datasource field; Favorites mode: “Reference” means that the Favorites datasource will only add the data the User will enter when adding the doctor to the reference, “Copy” – means that all the information on the doctors will be copied from the Doctors datasource to the Favorites datasource once added to favorites.
Now drag and drop the Advanced list where all the Favorites will be displayed. Select the Favorites datasource. Set up the list view and save. Continue reading “Add to Favorites” »
This control allows to auto-fill form fields with the contact information from Address Book on users’ devices.
This button allows to post to Facebook directly from your app. You can specify the post text in Snappii editor.
Add this button to allow your app users to post tweets to their Twitter. You can specify the post text in Snappii editor.
This button allows your app users to send emails with the predefined message you set up in Snappii editor.
Apart from default SignUp form that we offer you can use your own SignUp form. To create one, please add the SignUp form element on a Custom/New Tab and populate it with your fields. Add fields just the same you do for Universal forms, and match them with the Sign Up Fields placed at the bottom of the field settings. You can choose “not to use” if you have a field that is not listed in the settings. This data can be submitted to the email address, via web post mode and can be received as PDF, Excel file or in the Email body. This data can also be stored in the Snappii cloud database. Read more in our User manual here.
Adding this element allows you to control the login fields and customize the login view you with your app to have and your users to see. Drag and drop this element on the Custom/New tab, then add form fields to it. Match each field with the login field offered at the bottom of each form field you are adding. See the screenshot below.\n\n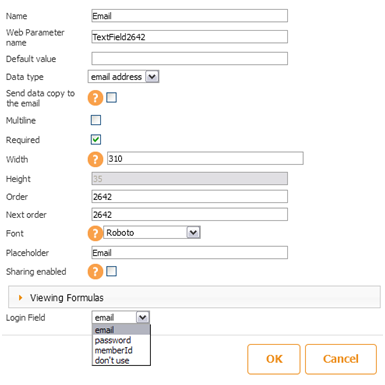
The Navigation button can be placed anywhere in the app and allows app creators easily open access to the destination element inside the app. The main benefit of using the Navigation button is to help the app user easily find the most relevant information inside the app without having to look for it.
To add side navigation to your apps, do the following. In Guru mode, select Visual Style –> App Layout –> select Side navigation. In Express mode, click Settings –> Visual style –> Edit. You will instantly preview the selected style on the device to the left from the settings
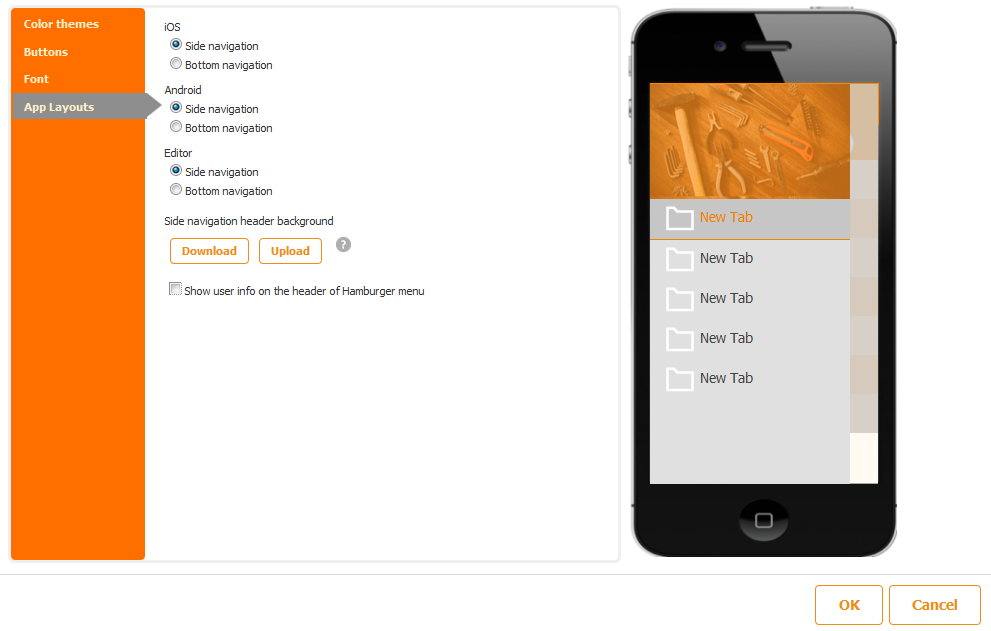
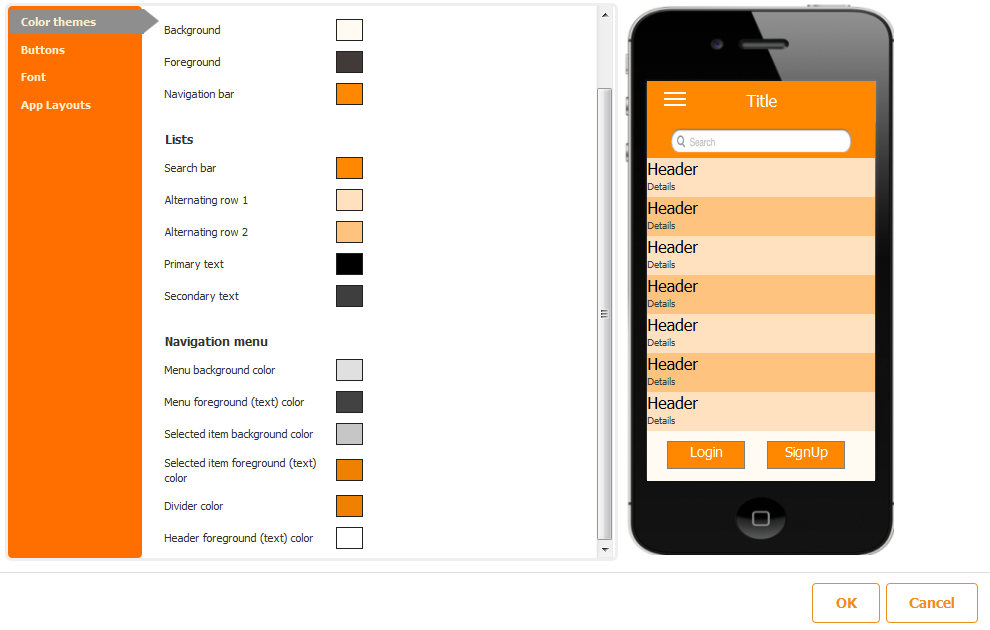
2. Change the background colors of your navigation bar. Under Visual style select Color themes –> Navigation menu
Remove Account Button allows the user to remove his account from app.
With the help of this button app creator can upload his own PDF form to be used in the app. App creator can allow app users to upload their own PDF forms that can be filled out, saved, edited and shared with others. There are 2 ways to upload a PDF file:
- From Cloud storage (Dropbox, Google drive, etc)
- From local storage (on Android device)
Once forms are uploaded they can be instantly:
– Used to enter information
– Filled out and shared with co-workers via email or cloud drives
– Stored locally on device or on cloud drives such as Dropbox, Box, Google Drive and MS One Drive;
– Printed
What’s more is that users can add additional capabilities (fields) to forms they have imported. The additional capabilities include:
– Signature capture fields
– photo capture fields
– time and date stamp fields
– additional fields to capture text and numbers
– show GPS location om the map,
– add bar code QR code scanners
– add radio buttons, multiple choice buttons, checkbox
Use Case. Fire inspector needs to inspect a fire extinguisher. The inspector opens the Fire Inspection app created by Snappii, clicks “Upload Form” button and loads a fire extinguisher inspection form that is used in the office. The form opens on the inspector’s device, and the inspector can easily fill out the data on inspection. The inspector can not only fill out the necessary details, but also add such data as location, date, signature, text, radio buttons and more.
You can play audio files in your apps. In order to do so, please drag and drop audio player button, and specify a link to the audio file you want to play. You can also upload a file from your computer. Only mp4a files are supported.
You can play video files in your apps. In order to do so, please drag and drop video player button, and specify a link to the video file you want to play. You can also upload a file from your computer. Only mp4 files are supported.
Data can be displayed as charts. Chart types: pie chart, bar chart, line chart, scatter chart
Use Case. You want to collect feedback about your website logo. You are considering changing the color of your logo. You have color choices: blue, green, pink, yellow, none. Create a datasource with these colors, select data type “boolean” next to each choice in the datasource dialog (we will have them as checkboxes) and the field to send colors to (name it choices). Data for the chart will be taken from that text field (choices).
You can view the results on the chart right below the question, or add it on a separate tab.
Read more how to set up charts here.

